The pen tool can be used for either creating a custom shape or tracing over a custom shape which we will look at as we work with layers.
Currently, if you are on Layer 1 or any layer, you can begin to create your shape using the Pen Tool (P). Refer to Figure 7-3.
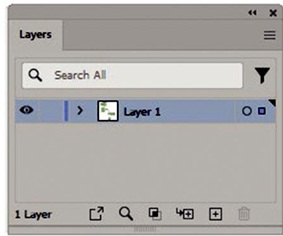
Figure 7-3. Use the Layers panel and your artboard to begin practicing with the Pen Tool
Here are a few things you need to know about this tool and its related subtools: Add Anchor Point Tool (+), Delete Anchor Point Tool (-), Anchor Point Tool (Shift+C), and the more specialized tool, the Curvature Tool (Shift +~).
Select from the Toolbars panel the Pen Tool. The Pen Tool relies on the current path’s stroke and fill color in the Toolbars panel. Press D on your keyboard if you want the same default colors of white fill and black stroke. Refer to Figure 7-4.
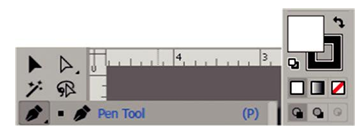
Figure 7-4. Pen tool with Toolbars fill set to default white and stroke black
With the Pen Tool, you can click a point. Before you click, you will see an asterisk by the pen icon. Then click another point somewhere on your artboard to continue to create a path. Each end of the path has an anchor point. Refer to Figure 7-5.
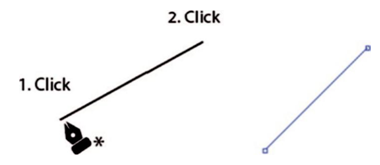
Figure 7-5. Use the pen tool to create a path
If you want the path to be straight, vertical, horizontal, or at 45°, then hold down the Shift key on the next click. Refer to Figure 7-6.
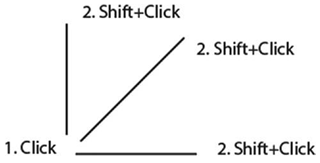
Figure 7-6. Use the pen tool with the Shift key to create a straight path
Click another point in your path if you want to continue with straight sides. Refer to Figure 7-7.

Figure 7-7. Use the Pen Tool to continue to create more points on the path
Or if you want a curved side, then as you create the next point, hold down the mouse key and click and drag in a direction to create a curve, revealing your anchor point handles. Refer to Figure 7-8.
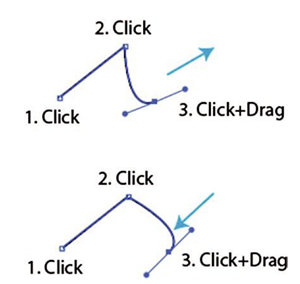
Figure 7-8. Use the Pen Tool to create a path with a curve
Tips On your first click, you can drag to start a curve right away. Holding down the Ctrl/CMD key while dragging can make the handles unequal lengths. Refer to Figure 7-9.

Figure 7-9. Use the pen tool to create a path with a curve
Release the mouse key to move your pen tool to a new location and click to create the next anchor point. Refer to Figure 7-10.
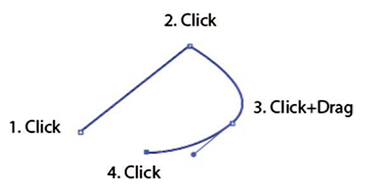
Figure 7-10. Use the Pen Tool to add more points to the path after creating a curve
Or click and drag to continue to round the next curve. Refer to Figure 7-11.
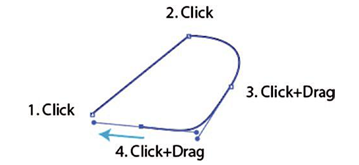
Figure 7-11. Use the Pen Tool to add more points to the path after creating a curve and curve again
Or if you want to return to a straight edge after the curve on point 3, release the mouse, then right away hold down the Alt/Option key, and click the same point again. Notice that the Pen Tool icon will change to have an angled path beside it. Then, when you click to create point 4, the path is now straight. Refer to Figure 7-12.
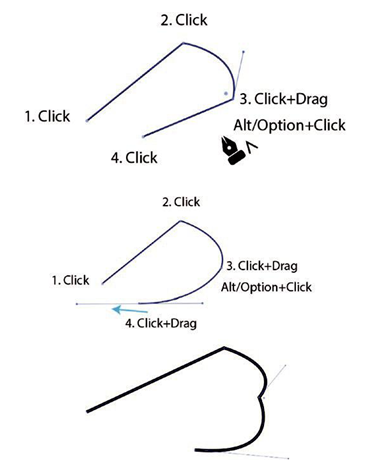
Figure 7-12. Use the Pen Tool to change a curved line back to a straight corner with Alt/Option+Click or curve the line on the next click and drag
Or you can click and drag for point 4 to create a curve again, but that point will be angled. This will be more obvious on more pronounced curves. Refer to Figure 7-12.
To close a path, click the original point 1. To know that it is joined correctly, as you hover over the point, you should see the Pen Tool icon add a zero or O icon next to it. Then click to close the path. Refer to Figure 7-13.
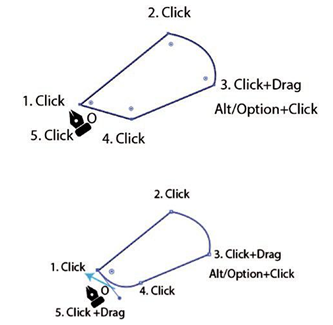
Figure 7-13. Close the path as either a straight or curved path with the Pen Tool
Or click and drag to close the path with a curve. Then release the mouse, and you should have a closed path. Refer to Figure 7-13.
Tip Adding the Shift key while you click and drag can also assist in your path adjustment.
If, while using the Pen Tool, you want to keep the path open and deselect the path to create a new one, then on the last point, you click hold down the Ctrl/CMD key. This changes the pen temporarily to the Direct Selection tool, and click elsewhere on the artboard, and this will allow you to deselect the path and keep it open. Refer to Figure 7-14.
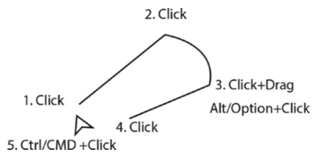
Figure 7-14. Leave the path open using the Pen Tool when you Ctrl/CMD+Click